Pages

Introduction

I hope this site is of value and contains information. I will record my ramblings regarding sailing adventures, my boat projects and anything else that might interest people attracted to a site about Wharram catamarans.

Please visit again for updates and do leave your comments.


Friday, 6 January 2017

Part Spun Fun With Sail Panels

Here's an update on the progress since the last post on designing the spinnaker.

Creating appropriate 2D panels

After some thinking I realised the way the 2D panels are created is important. The model I initially created in Blender was a "perfect" smooth curved surface (a nurb surface). This was based on a real sail design the I borrowed! and scaled a little to the boat.
Tiki 21 with an A2

To make 2D panels, I first needed to create a mesh representation from the perfect surface. But it occurred to me that the type of mesh was important. Each panel in the sail should be something which can be folded out flat without any stress in the panel. This is not the case if the initial mesh shown below is used.
The problem is the software simply cannot make a flat 2D panel using the mesh made of the back grid cut along the red seams. It can only approximate this. i.e. in the resulting panels the mesh edges lengths will not be the same when flattened as they were the curved model. i.e. the panel must be stretched a little to make it flat. This results in errors in the panel 2D shapes.

To solve the problem, I first converted the perfect sail into a near perfect fine mesh. Then I cut the sail into the panels. I then took each panel and deleted the internal mesh leaving only the perimeter vertexes for a panel as show below.

It should be understood that the edges of the panel (hole) are not straight, so the cut out is not flat (see below). I then created a new mesh of triangles using the perimeter vertices. This gives a mesh that can be laid out flat without any stress. i.e. it could be made from paper panels.

This might seem a bit complicated or over the top. Perhaps it is? However, I arrived here after lots of experimentation and only this way can I create 2D panels that when sewn in cloth and flown from the boat, should, in theory, adopt a shape close to the model shape!

Here's a single panel that can be flattened out, shown in its original position within the sail.


So how to mark out 3.5 meter long panels from the computer models ?

Sunday, 4 December 2016

Spinning the Spinnaker

I wonder if the meaning of the expression "it's taking shape" comes from sail making?

After a number of dead ends, I think I am making way. I now have a 3D model of an A2 spinnaker sized to the model of my Tiki 21. I can mark out the seams and make a 2D surface development of the panels for cutting. I've tested this by cutting out paper panels to make a model.

Here are a few notes for those that are interested on the journey and lessons learnt.

Sail Design

The first thing I need is a good sail shape. Then I need to realise the design in cloth. Both tasks are difficult. I need to know what shape is right, and then how to make this from flat cloth.

I don't know what shape is exactly right. Clearly I can look at lots of pictures and guess, but I don't want to spend too much time and money on a guess. My approach is to copy an existing shape for the design and use a computer to build a 3D model and develop the necessary 2D panel shapes from the model.

There's plenty of detail on all this in Brian Hancock's excellent blog and website.

Sail Shape

To obtain a good shape, I've been a bit naughty. If you search the web you can find 3D visualisations of sail designs. You can't download these, you can just "look". But that's enough for me. If I look from three orthogonal axes and take screenshots, I can reconstruct a 3D model. I did this in Blender 3D.

Orthogonal Screenshots as a template design
Tiki 21 with an A2  Tiki 21 with an A2

The sail design shown has the following dimensions: Luff: 6.2m, Leach 5.8m, Foot 4.6m Total area - 21.5 sq m. 

With my sail shape defined, I need the panel layouts.

Software

1. Sailcut CAD

Sailcut CAD  is a program with a long history and allows a sail design to be specified in terms of a set of parameters, e.g. foot curve, luff curve, twist, mid girth etc. It takes the design and creates 2D panels with seams. These are cut from cloth and the sail assembled. Sailcut allows head and fore sail designs in various panel layouts, including radial designs.


I took my desired shape and made a set of measurements according to the parameters required in Sailcut. All looked good. I exported the 3D design from Sailcut to Autocad DXF and imported into Blender 3D. In this way I can compare my desired design with the generated design from Sailcut.

After a number of iterations, I found that Sailcut simply will not give me the shape I want. It is expecting the luff to be bent on to a forestay with a small curve in it due to the wind load. It doesn't expect a flying sail, fixed at the head and tack. No matter how hard I try I cannot make it work. Time to rethink.

2. Blender 3D

Blender 3D is an amazing tool. It's also free! It's primary purpose is to develop 3D games. It supports 3D modelling, photo realistic rendering, animation, physics models and plenty more. The image below was create using blender.


It is so good that you can use it for many 3D CAD applications. Since I have a 3D model of my desired shape, can I use Blender to create the 2D panels? If I can, I don't need Sailcut.

A bit of searching on the internet and I found an add-on for Blender called Sailflow. This add-on allows sail shape development using parameters a bit like Sailcut, and panel development. But I don't need the shape development, as I already have a design. I tried this add-on and although it looks promising, the panel development doesn't quite work. I created 2D panels, but it makes a mess of some panels. It's just not working for me.

3. Dynamics of Cloth

It is clear that a smooth 3D surfaces can be approximated with a mesh. The finer the mesh, the more accurate. If the mesh is used to define flat panels, cut out in cloth and assembled, the stretch in the cloth means that the sail, when flown, will take up the smooth shape. To make this work exactly you need the panels to be the right size according to the expected wind strength and cloth stretch characteristics. Working that out is too difficult. After all, it's a Tiki 21 and not an America's Cup trimaran.

If I assume that for the panel sizes I want, the stretch etc. will work out, then I can disregard the dynamics and just flatten out my 3D panels into 2 dimensions. It turns out that Blender has the ability to do this using a feature called UV unwarp. I tried this out and compared the output with a Sailflow panel that did work. They are the same. So I can ignore the add-on scripts and just use Blender's built in tools, but there are 25 panels and it will take time to do. Surely there's a short cut?

4. Paper Model

More searching the internet. This time for a Blender add-on for surface development. I found Paper Model. This add-on tool allows a mesh to be cut with seams and the panels exported to an SVG file.


It's purpose is to make a layout for assembly into a paper model. It is very close to a sail panel layout, just a lot smaller. I tried it and here's the result


Conclusion

I'm making steady progress. It's fun and I'm learning a lot. The following considerations are still to come:
  • How smooth a model (how fine a mesh) should I use?
  • Double check the tack sheeting angle alignment with sail's radial panels.
  • What seam layout do I need?
  • What detail do I need at the seam junctions between 3 or 4 panels?
  • What is the best order of assembly?
  • How to best mark out the panels on materials?
  • Do I need to make a test sail to gain experience?

Watch this space for more ramblings.


Tuesday, 15 November 2016

Some History

Scott Brown of the MultiHulls website was recently in touch to see if my green Wharram was the same Gratitude that he knew of. I am aware of the history of the boat, and Scott confirmed much of the detail. Kindly, Scott then sorted this out for me ....

Sea People article mentioning Gratitude

Sunday, 13 November 2016

Noss Mayo Return - South Hams


Noss Mayo Return - South Hams

I should apologies for this indulgence. It's over the top, but was fun to make. Hope you like it.
I'm not quite sure what I can do next?

Tuesday, 8 November 2016

Brexit & Trade Deals


In the new spirit of Brexit, which I am forced to accept, I've opened up trading with China via ebay. It's taken since the referendum, but they've finally arrived. Not bad for £15 including delivery.
Tiki 21 Deck Tent mounts. Bimini mounts.

Tiki 21 Deck Tent mounts. Bimini mounts.


So after weeks of waiting my deck tent project comes to life.


 I've used a modified Vango tent on Gratitude many times and it works well.
The problem with this tent is the time it takes to put it up and take it down. This can really eat into the day when trying for an early start. Furthermore, I'm not sure how well this tent will work in bad weather.

I've started a new project page to cover my ramblings on the deck tent. I'll be updating the page as thing progress.

Tuesday, 20 September 2016

Champagne Challenge 2016

Last year my friend and I motored up to Brixham marina's event pontoon at dusk and to a round of applause. We'd finished the 2015 Champagne Challenge a hour or more after the other boats. This year I was keen to try again, and with a nice north-westerly forecast, it looked good.

I was a bit short of crew. My normal helpers were both away, and I'd all but given up. Then I thought I could take my 11 year old son Charles. He'd be able to keep up going in approximately the right direction while I messed about with sails?

After a few essential jobs on the mooring and rigging the my new spinnaker guys we motored out to the start. The Champagne Challenge is a fun cruiser race from Exmouth to Brixham orgainised by Exe Sailing Club. Two classes, club and fast, were set to start and 11:00 and 11:30 respectively. With around 45 boats entered and other clubs on the water, it was all a bit stressful. The start was hopeless with the 5 minute call ending in the word "GO" which confused most. I didn't hear much else and wasn't watching the flag as I was busy avoiding other boats.

It was soon clear that we were off. We got over the line about half way down the field. As soon as I sheeted the main, a big gust drove the boat hard with the port hull pressed down as we hit 8knts+. I was a bit concerned that it might be all a bit too much to handle largely on my own. But soon enough we were reaching down the first leg and making ground on all but the lead boats. These led by Rory McDougall in Cookie, who seemed to disappear as if powered by a different wind.

We did well, but lost time a places on the first downwind leg as I messed with the spinnaker. The next reach was fast and fun and the final run had the spinnaker set in the middle as I'd planned.

A great day.

Three Wharram Tiki Catamarans
Cooking Fat, Gratitude & SCAT in Cat Corner

Sailing boats in Brixham

Charles in the cockpit of the Tiki 21

Charles is ready for bed

Sailing a Tiki 21

Beam reach sailing Tiki 21

Monday, 14 April 2014

First Cruise 2014


Back in October 2013 when Gratitude went into her wintering barn for renovation, the spring seemed too far away and there was plenty of time for all the work. Come March, much progress had been made and a date was fixed with a friend for our sea trials.
I'd bought Gratitude, my first sailing boat, at the end of last year after borrowing her for a few test sails. There was a bit of work to do, but essentially she was sea worthy. As the winter wore on, the paint was stripped away and problems emerged. Nothing serious, but all added to the workload. I built new platforms with a bigger section to take the fuel tank. The mast was rotten, so an alloy tube was procured. Sections of the gunwales were wet or rotten. An old hole was to be repaired.


This was two weeks before launch!
About 6 weeks back, I realised time was tight and planned out the remaining work. A task list was generated and spread across the calendar. Each day went by and more tasks were pushed down the line. They stacked up ominously against my deadline. With two weeks to go, I warned my friend that I might not make it. With a week to go, I thought there was a chance, but could he come down early to help with the work? By the Wednesday, the Friday's departure had become Saturday's, Thursday's rigging had become Friday's launch and rig.
Painting hulls on Tiki21 with 2 pack Jotan HB primer


On Wednesday, I drove the 12 miles back from the boat to Exeter to collect my friend who had arrived from Yorkshire. We grabbed a few things and returned to the boat and applied a coat of paint to the decks. We worked through the evening then drove back to Exeter and began work on the mast head which was to be built from the old mast, inserted into a new 6 meter alloy tube. We epoxied up the mast parts towards 11pm and went to bed. Thursday we painted the decks, beams and platforms. We had the space-heater on flat-out to get the drying times down. Anti-slip went on last. We left the barn at 2am only to return the next morning at 9am.

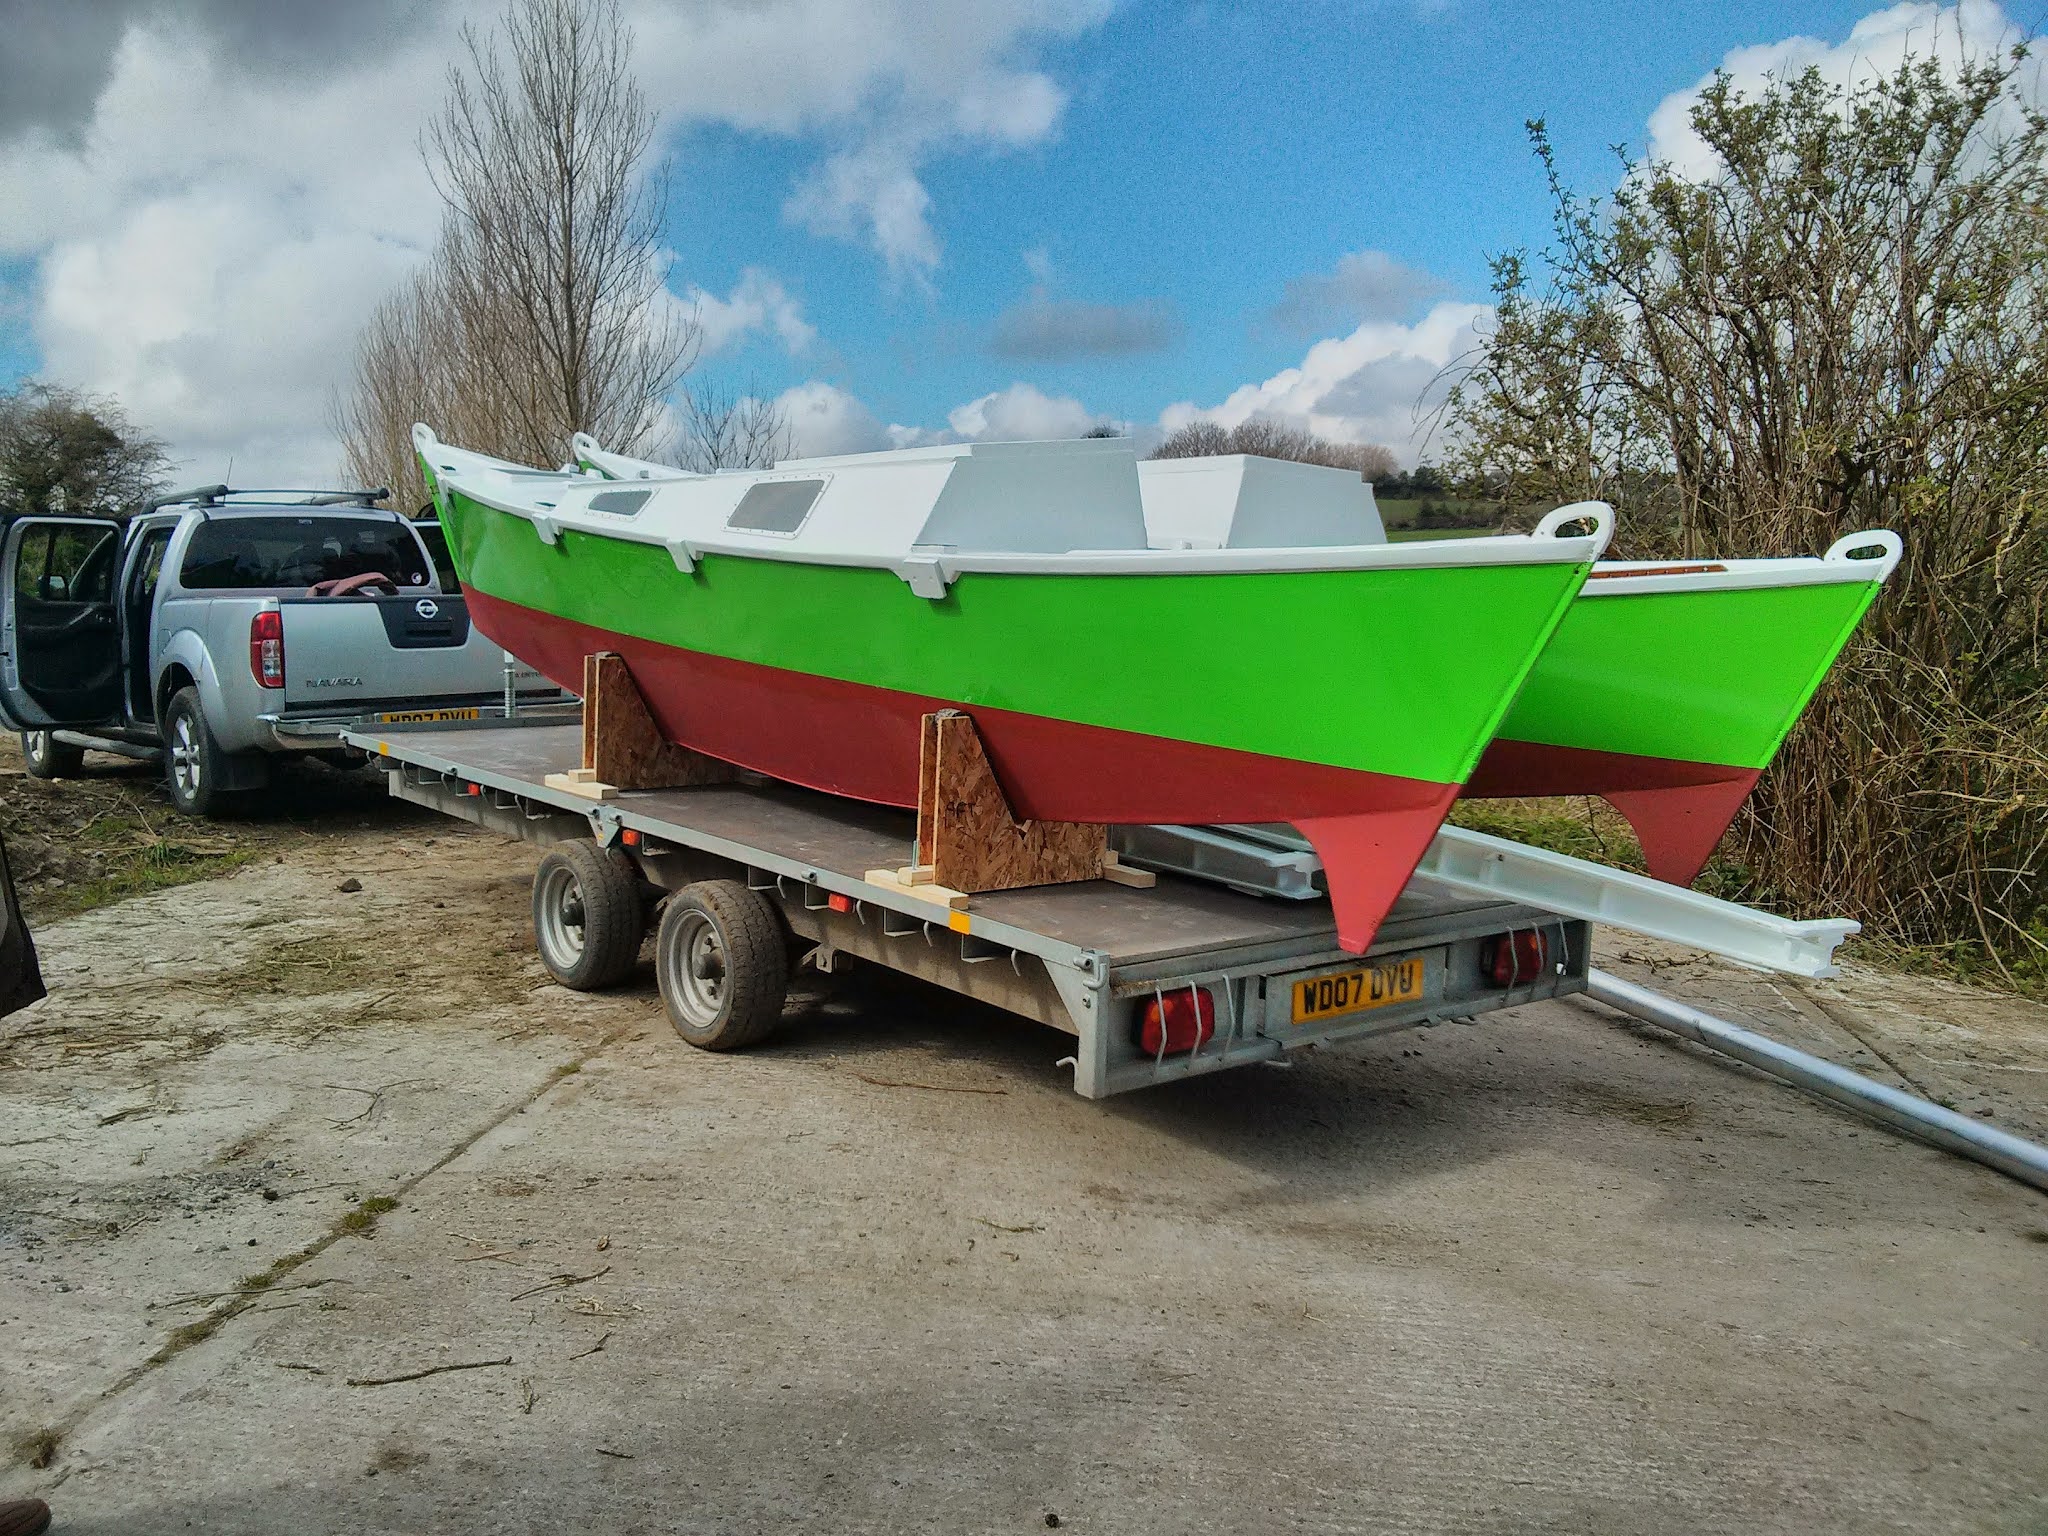
Newly finished and painted Tiki 21 hulls on the trailer


The plan for Friday was to assemble the boat on the Exe estuary from around 10:30am at low tide. By the time we finished assembling the mast, placing the boat name vinyls etc., it was late. We made the estuary around 1:30pm where the tide looked to be a mile off. As you can imagine, we were soon up to our knees in water trying to lash the beams. But when it comes to the crunch, luggage straps will save you every time. Temporary construction complete, the mast on board, and we were away off down the river to the mooring. We had real fun with the brand new dingy which was under inflated and only the ends of the paddles to make way. But we made it; we were on the water.


Tiki 21 Gratitude is relaunched


Saturday was rigging and departing day. Again, so many jobs plus shopping for provisions. We beached the boat and worked hard all day. Come 5pm we were sort of ready and the car was now in 6 inches of water. We packed down loaded the tool box and remaining fittings, parked the car and fired up the outboard. We motored out of Exmouth with the cordless screwdriver working hard to fit cleats that jammers. 15 minutes later, up went the main and caught and increasing breeze. 30 minutes later we had on the waterproofs in a force 3/4 and the quartering waves washed through the front where the trampoline is suppose to be. On one gust I dumped the wind and wondered if the mast epoxy was really cured!
Dingy ride back from the Tiki 21


We pulled into Brixham marina as the evening light began to fade. Being a cat' we needed a wide birth, and we were duly placed amongst the luxury yachts. We set up the temporary tarpaulin tent and dressed for dinner!


Tiki 21 Gratitude moored in Brixham marina

The next morning the sunrise had taken away the panic pace of the previous 2 weeks and we finished a few jobs in normal time. We laced the front tramp as the sun's warmth came through. We set out for Dartmouth.
Sunday's sail down to Dartmouth was in a light breeze with a short motor. The weather was perfect as we entered the river mouth. The wind came in behind and styled up passed the Royal Dart Yacht Club with the cruising chute raised high dragging us up river.
We drifted up further on the tide and calculated that we could make Tuckenhay in time and be away on the morning ebb. We called the pub and booked the pontoon mooring and a table. Perfection.


After a heavy night, we were woken by a glorious dawn chorus and what seemed like a fight between the ducks and geese. The sun rose as we drifted away.

 The smell of our cooking sausages hung in the mist as we made our way down river.


We ate breakfast at Dittisham and drank coffee passing a huge American yacht coming in to the river. We put our life jackets on as we passed the lifeboat towing in a yacht with a failed engine. We set sail into the wind and wondered if we could beat our way all the way home. We got to a tack that would pass Berry Head by 11am. The wind then duly dropped and from then we motored and sailed a little.
We made the mooring in the Exe at high water by 6:30pm. We were sunburnt, tired, hungover, happy and afloat. Happy days.